 |
Tiananmen Square Photo by kinabaloo.com I will be in Beijing for four nights and will get to see such sights as Tiananmen Square, the Forbidden City, the Temple of Heaven, a day trip to see a section of the Great Wall and we have a visit with a Chinese family in their home. Check back after May 15th for more on my China trip! |
Saturday, April 30, 2011
Beijing
Wednesday, April 27, 2011
再見 (Goodbye)

I left for China this morning at 4 AM. By the time you are reading this, Dear Reader, I should be well out over the Pacific.

I have tried to pack lightly, not something at which I am particularly good. But I have tried. I put in everything I wanted to take and then took out over half of it. I should be okay. We are only allowed 44 pounds for our one suitcase on this trip. Humph. I carry that much in my purse!

I won't be able to post while I'm away, but as you can see, my trusty Nikon is packed in my carry-on bag. Expect many posts with photos once I return, mid May. Ta until then.
Be safe, be happy. I'll miss you.
Monday, April 25, 2011
Happy Birthday, Jen!

Happy birthday to my darling favorite (eldest) daughter. She likes to point out that she is my favorite (eldest) daughter. And, truly, she is my favorite (eldest).
The handsome guy? Oh, that's her husband. Uncle Critter, we call him.
I hope your day is spectacular, my darling favorite (eldest) daughter. I know this will be a most special and wonderful year for you. For you and Critter. For us all.
I love you.
Sunday, April 24, 2011
Happy Easter

To those of you who celebrate it, a most Happy Easter to one and all. To everyone else, Happy Spring (or Autumn for those of you in the Southern hemisphere).
The above photo shows my wonderful Indian-style truck, that sports various loads throughout the year. Right now is is full of eggs....pysanka eggs and decorative eggs. Pysanka eggs are also called Ukrainian Easter eggs.

There are people who make the most amazing pysanka, but I am not one of them. Years ago I did a few, badly, that I have kept safe and stored in an old egg carton most of the year, but the real thing is just a glorious jewel-like egg, full of Orthodox symbols.

The few examples here are mine. I am proud of them because they took me hours and hours of time, but they are not glorious and they are only pysanka in the most broad definition.

You take an egg that has had its innards blown out, then a little do-hinkie called a kistka (stylus) that lets you draw on the egg with molten bee's wax, and you draw and then dip the egg in ever darker colors of dye. It is laborious, pains-taking work, and I was never any good at it. But it was fun to try.

Trying something new is always good, even if your results are MUCH less than perfect. Trying out an art or craft from another culture is also a fun thing to do and, I believe, makes you more open-minded and hopefully, more tolerant. And that, as Martha Stewart would say, is a good thing.
Wednesday, April 20, 2011
Cold Spring
It has been the coldest spring I can ever remember. And wet. Really wet. The rain and cold just seem to go on and on and on. I read about other parts of the US experiencing cold, too, so I guess we are not being singled out for special punishment. It feels that way, though!
In the past week we have had rain, drizzle, wind, rain, partly cloudy skies, hail, rain, snow, blue skies and rain here in the Pacific Northwest. I have not had the snow at my house, but it has been very near by. Silly weather.
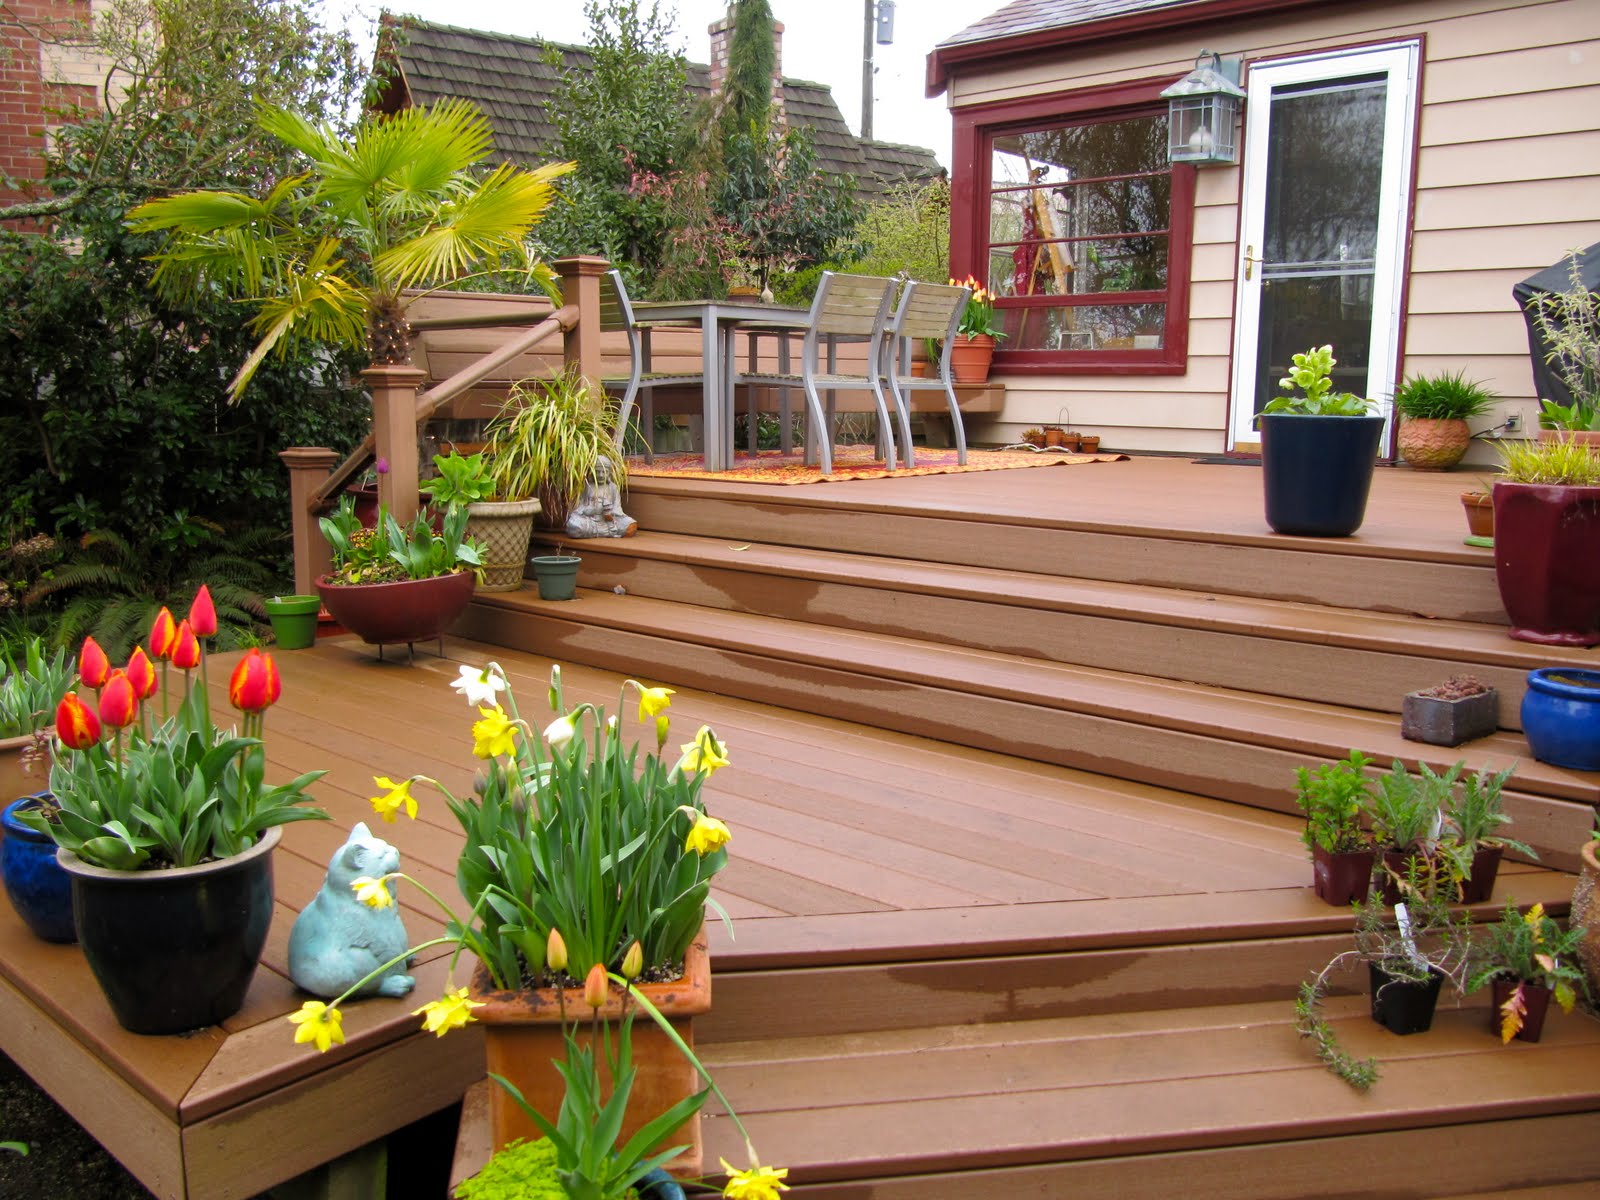
The only compensation is that you can't keep a good bulb down. My tulips and daffodils are spectacular and every time I open my back gate and enter my little, secluded backyard, the blast of red orange from the tulips lifts my heart and spirits.

I bought an outdoor carpet for the deck and I must say, I like it a lot! It just makes the whole deck seem like another room. The carpet is advertised as not mildewing (important in "Rainland" where I live!), won't fade, lets water through and is made of all recycled material. What's not to like?

My kitty statue, a gift from a dear friend, guards the pots of daffodils and tulips.

The clematis is budding out. I can hardly wait for it to bloom. The blossoms are huge, the size of dinner plates, and a creamy white that glows.

I am very partial to this primrose, the name of which I have, of course, forgotten. I love the white edging.

Saturday, April 16, 2011
A Workshop with Michele Usibelli

I had the great pleasure of taking a class from Michele Usibelli today at the Cole Gallery. I have long admired Michele's work, and I am lucky enough to own five of her paintings. I must admit that they are all miniatures, but they are beautiful and they brighten my home.

We were a class of 13, from first time painter with oils to several people who are quite experience, and one professional artist. All of us are drawn to Michele's work---her free but sophisticated style. While she makes it look easy, believe me, it's not.

She starts out by doing a drawing on the canvas, to make sure the composition works, that things are where they should be and to establish the focus for the painting. She simplifies, to zone in on what is most important.

Michele works quickly, but is very deliberate. She tries to only put a stoke down once, meaning that she does not want to go back over that area, but to get it right the first time. It was fascinating to watch her. She was deliberate, almost emphatic, with her stokes, and while she could be bold she was often gentle. I learned so much by just watching.

Her method is unique (to me). She starts with the focus area of the painting and works out from there. She will "lose" the drawing, while painting it in, but then uses her background strokes to "carve" the forms back in. She is very conscious of value and edges. She tries to use her brush to form the shapes. All of these ideas I have been taught before, but watching Michele in action really drove it home for me.

The two girls, shown above, are mostly finished. You can see how they jump off the canvas. There will be middle ground and backgrounds done, of course, but the meat of the painting is there, practically fully formed. It took her maybe an hour!

The painting above is one Michele did of a teenage boy. She explained how the boy whose photo she took was actually wearing a brown jacket and white shirt, but to make the composition stronger, she changed the shirt to red and used the complimentary green to make it "pop." Colors across the color wheel from each other, dark against light---Michele kept reminding us that while she paints she is always having a mental conversation with herself.
It was a wonder to watch her.
Below is one of Michele's paintings, called The Secret. I bought it last year and it reminds me so much of my granddaughters. I couldn't get it to photograph well, but trust me, it's spectacular in person.

And here we have another of Michele's paintings. I can't remember what she called this one but it's always been The Nap to me.

And here's a crow she did, that I adore. (I have a "thing" for crows in the first place, and this little painting captures this fellow so well.)

And, finally, here is my unfinished painting from the workshop. I tried to put into action what she'd taught us, but alas, I didn't do so well. I did find that I was understanding more, however, and I can see where I need to change things and maybe, just maybe, how to make it better. It sure was fun trying.

Thursday, April 14, 2011
ArtFest: Mail Art Class with Orly Avineri

On the third day of classes at ArtFest this year, I was lucky enough to be assigned to Orly Avineri's Mail Art class. It was the perfect choice for day Three of ArtFest. (For those of you Dear Readers who have never attended ArtFest let me just say that by day Three you are exhausted. You are exhausted by overwhelmingly wonderful classes, brimming with new things to learn and master; exhausted by laughing too much, staying up too late, channeling the joy and excitement that is inherently ArtFest. It's a good exhaustion, but you are still beginning to fade....)

Orly is a wonderful teacher. She starts things out by being very orderly. Everyone follows the same steps in the same order. (You chose your own pallet.) You just sort of do as you're told and trust in Orly to take you to a place where it all comes together and becomes your own art. And it always does!
I love it that I can sit down in Orly's class and turn over control to a teacher who obviously loves to teach and has a plan.

We used large pieces of watercolor paper. First we got them wet and applied acrylic ink in whatever method felt right. I squirted the stuff all over and took great pleasure in watching it begin to blend together. When the blending did not happen soon enough, I held the paper up so it could run together in interesting ways. Then I folded it over on itself and had a sort of mini Rorschach test. Then, just when you are beginning to really like what you've just let happen, Orly has you turn the whole sheet over and begin to work on the other side. Now, please remember, all that acrylic ink is wet. It's now face down on the paper covering the table. You've just....let go of control. You're in free fall. It's wonderful!

And now you are facing another white page. Orly has you add some collage elements from a stash of papers she always provides to her classes. You randomly pick out some, and randomly, glue them down. Then you add gesso. Over everything. You can wipe away some of the gesso from the collaged spots, if you wish, or leave them covered, or whatever! Then acrylic paint is added. In your colors. With black or without black. You can add more gesso, more color, penwork, whatever feels right. Once you have a nicely covered sheet and it is dry enough to tear (or cut), you get your postcard shapes torn out. (I like a torn edge.)

Now you have a pile of cards that you add more ephemera and collage to, more paint, ink, penwork, whatever. This is where your point of view comes to the foreground and it becomes something you are in control of again. You are creating the postcard. You are fiddling and adding and embellishing and making it your art, your work. And by this time you are so relaxed and into the process, it's easy. It's fun. It's joyous!

Oh, I tell you, that Orly! She has a plan!

We made envelopes out of "found" paper. I took two very different papers, one a celestial map and the other of a monk, glued the sheets to each other along an edge, folded it up into an envelope shape, taped the edges with Japanese washi tape and voila! A one-of-a-kind envelope, worthy of enclosing some wonderful missive or treasure to be snail mailed to someone worthy.

The lovely young woman above was my table mate in the class. She was charming, delightful, shared all her goodies with me and kept me entertained all day. I think (Good Lord, I am so bad at remembering names!!!) her name was Missy. I am sure she is from Arkansas. I thoroughly enjoyed spending the day with her. (If you read this, Missy, please let me know if I have your name right. If not, let me fix this post!)
Below is the adorable, the talented and the beautiful Orly Avineri. Thank you for a wonderful day. I have been sending my postcards all over, to friends and family near and far. I will use up my present supply of postcards and then make more, thanks to you.

Wednesday, April 13, 2011
ArtFest: Journaling Classes with Jill Berry

I took two journaling classes from Jill Berry at ArtFest, and both were excellent. I really loved the Journal Mapping class---I'm a little biased towards that one as I was a Geography major at university and I took a lot of cartography classes. Maps and map making have always fascinated me and Jill has given me ideas for how I can incorporate maps effectively into my journals. The map above is one that Jill set as an assignment for us in class. We were to design our own planet. Mine is called Dragonia. Why, you ask, Dear Reader? Because I have always loved the notation on some antique maps stating "Here abide Dragons" in areas that were unknown or unexplored. I had great fun with this assignment and I'm still in the process of naming areas of Dragonia. So far I have the Icy Ocean and the Gulf of Summer, the Tropics of Illness and Unicorn, and I worked my name into the topo lines in the north arctic region. I am going to keep playing with this map.

The two above maps are a celestial map and a map of how to get to my cabin. We put down stars on a page for the celestial map and then tried to find a shape or thing to draw in the shape of our "constellation." I fudged and put my stars down in a vaguely whale shape as I am partial to whales. It was fun and I liked using the stars as a resist for the background color. The map to my little cabin was fun, too. I've gotten some of my personal names for places on the way to the cabin listed (Hoochie Coochie Curve and By Golly Gully---don't look for them on a 'real' map, they aren't there!). Best of all, Jill showed us how to fold both a square and a rectangle so that large pieces of paper can be incorporated into a journal in a clever and space saving way. I always wondered how you did that and now I know. Jill called it the Farmers Purse and I have found it listed as the Turkish Mapfold, in case you are interested in folding up something.


Here you can see an example of the fold used on a rectangle. It's so slick! I love being able to add things to my journal using this technique.

The other class I took from Jill was called Spontaneous Deconstructed Journals. Jill taught us how to make very cleverly bound journals. The really nice thing about this journal was that you could work on the paper while it was still flat, then fold it and bind it at a later time. It would make a very convenient way to do a travel journal (or really, any journal) as you could travel with flat, unbound pages. Each page is folded in half, the spine is an accordion pleaded piece of something sturdy, and the open sides of the pages are then glued to the spine.

We each made a little journal and used different techniques for lettering, charting, adding textures with tissue and using rubbings as page elements.

The page above has a little spinner I made to show weather. We have been having such crazy weather around here---it seems to go from sunny, to windy, to hail, to rain, to sun and so on and so on and so on....all in the space of ten minutes. I thought a spinner would be a good way to get that across in a more visually interesting way in my journal. Other people did other kinds of spinners.

The partially unfolded map above is one of Jill Berry's and was her trade for ArtFest.

We cut out windows and used acetate for the window "glass." You can see the cedar sprig, above., in in the 'window' I made.

Jill encouraged us to do interviews and ask questions to add interesting content to our journals and to made a map of sorts of the answers. You can see my table map above. I asked my friends the night we dined at Ichikawa to tell me about their favorite ethnic food and what they would order at a restaurant serving their favorites. I got a lot of interesting comments and it turned out to be a great conversation starter. I plan to use that technique on my upcoming trip to China. I think it will be a good way to get to know the other people on my tour.

And here you have the cover of my journal.

I used a lettering style Jill taught us along with photos I printed with my Pogo printer on the above page.
I had the best time in Jill's classes and was extremely pleased with all the new techniques and ideas that she passed on to us. She's a very organized teacher. Her class flowed and there was always something new to learn but yet, she gave us enough time to get the new technique down. I liked her humor and her historical asides about cartography, but most of all, I enjoyed meeting her and getting to know her a little. Jill has great energy and is really encouraging. If you have a chance to take a class from Jill, jump at the chance! She's a great teacher, in my opinion.
Finally, let me introduce you to the lovely Jill Berry.
Tuesday, April 12, 2011
ArtFest 2011: Day One

After we checked out of our B&B in the morning, we roamed Port Townsend, doing a little shopping but mostly getting in a nice walk. We explored the new Maritime Center that is just being completed. It's quite a handsome wooden building, with places to store skulls and other wooden boats and has great launching facilities. It has a nice deck on the water side. There is a cafe and The Wooden Boat Chandlery (where we each found a thing or two we had to have).

We checked in for ArtFest at Fort Worden in the mid-afternoon. We were billeted in Dorm 225, our favorite, in a nice double room. Well, "nice" at Fort Worden is misleading. It's not fancy. It's clean and comfortable, but not fancy. You have to make your own beds and share bathrooms, but it is great fun to be with a whole bunch of like-minded individuals for the four night, three day event.
And I do mean individuals!

Here we have Nonie sitting in our room in the dorm. We made it rather cheery with our quilts from home.

After our first day of class (more later) Nonie and I met my old friend Michele in town at Ichikawa, a very nice Japanese restaurant. Michele brought along two more friends, Teri and Denise. We had a great meal and lots of chat and laughter. We had a chance to unwind and talk over our classes.
I had the black cod. It was excellent.


Nonie and I celebrated by each having a "saketini." It turned out to be sake, plum wine and a goodly amount of candied ginger. Delicious! I wouldn't want to have more than one, however.

We were seated in the tatami room at Ichikawa and I had this interesting view out the door of the little dining room toward the bar.

The sun was just going down as we returned to the Fort from town. I love the way the sunlight was highlighting the lighthouse.
Subscribe to:
Posts (Atom)