
Ah. You are wondering, Dear Reader, the meaning of the large cooler of fish?
Well, they were all used for printing. Fish printing. Gyotaku, to be exact. Gyotaku just means fish printing in Japanese. I did a lot of fish printing while at the NPS workshop in beautiful Fort Collins, Colorado. The Nature Printing Society has a workshop each year and many of the very talented members teach classes in their areas of expertise. Since this was my first workshop and since there are so many members with great skill at gyotaku, that was my chosen area to explore at the workshop.
I must admit that I am fairly new to printing in general and until the start of the workshop, had never printed a fish in my life! I had three great fish printing instructors and learned three different methods of printing.
My first class was in direct fish printing---where you ink the fish directly and then put a sheet of paper (gently!) over the inked surface. Jack Schwartz was the instructor and he was a very good teacher.

Jack showed up how to clean our fish to remove any bacteria that would, in years hence, come to eat into our print and/or cause stains to the finished art. You have to clean the fish with soap and water, then alcohol and more alcohol. It was much more rigorous a procedure than I had imagined.

Once the fish is clean and dry and you have sealed it's various openings with crazy glue (!!!!), you need to cut and position supports for the fins and tail, so you will have a steady, flat surface to work on.

We used foam core and T-pins to elevate the fins and hold them in position. Once the fins and tail have dried the way you position them, they stay in that shape and the pins are no longer necessary.
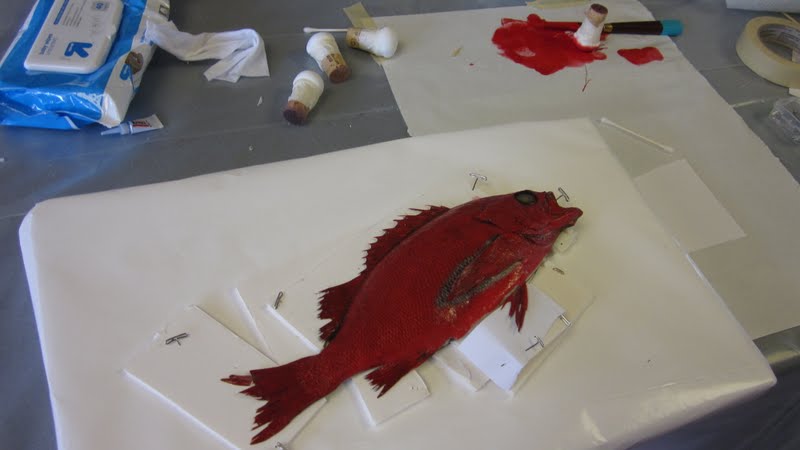
I chose a rock fish. It was quite a lovely specimen and a fish for which I have a great fondness. When I was a girl, my father and I used to take weekend fishing trips to Puget Sound or Hoods Canal. Our favorite eating fish for these trips was rock cod. Anything that reminds me of my father and those happy memories is okay by me.

Here are a couple of my fish direct fish prints, before I got the eyes painted in. There is a lot of room for improvement, but Jack made the class a lot of fun and I had a really nice day printing my rock cod. Once I was done, I cleaned the fish of ink and returned him to the ice chest so it was available for others to print as the week went on.

Here is my fish for the indirect fish printing class, taught by Lori Ann Loftus. Lori taught the beginning indirect class. I was amazed at all the steps involved with the indirect method, many more so than with the direct method.

As in the direct method of fish printing, the printer must first get their fish properly cleaned, dried and the openings sealed. You must then dig out a spot for your fish to sit into on a piece of insulation board, trying to get the fish as flat as possible. The fins and tail must be supported for them to print properly. You need to make stencils for the edges of the fish and the pectoral fin. Once you've done all this, then you cover the entire fish with paste and gently ease a piece of silk onto the fish, working out the wrinkles, until the entire fish is covered. Then you dry the silk-covered fish with a hair dryer or sit it out in the sun. (Yes, the room did get to be rather pungent with the smell of warm fish!)
Once the silk is dried onto the fish, you are ready to start using tampos (a sort of pouncer made with a toothpick, silk batting and fine silk covering it all) to apply colored inks to the silk. Because you are printing onto silk with the fish underneath, the process is indirect, but amazing detail is achieved with careful inking. A well-done gyotaku of the indirect method will show every scale and every ridge of the fins of the subject fish.

In theory, it should take 30 pounces on one spot with an inked tampo before any color begins to show on the silk covering the fish. To my mind this is just craziness! I am not a patient person and all the masking and pouncing and tampo-ing and fussing required of the indirect method were not well suited to my impatient, get-on-with-it temperament! Needless to say, my fish is lacking in finesse, but I surely do have a great deal of respect now for a well executed indirect fish print. I will, however, not be using that method again!

Sharron Huffman led my third "fish" printing class. What were were actually printing were octopuses. That actually leads me to the question of just what, exactly, is the plural of octopus?
Sharron Huffman turns out to be delightfully funny, terribly talented and an all-around lovely human being. I just adored her class on printing the little critters and had more fun than I could have reasonably expected.

As in any method of gyotaku, you must first get your octopus dry, dry, dry. (And you have to seal up those pesky eyes and get the silt left by cleaning the octopus really dried out, too.) We then used bits of paper towel to stuff the "heads" into a more normal shape. (These octopuses come in 5 pound frozen blocks and are usually from Thailand or Vietnam.)

Once you get your specimen ready to print, you need to mask the area under the legs with paper and then ink the little guy with ink. Sharron uses a foam brush in a pat and dab sort of movement. She is careful not to leave brush strokes.

Once you get the body and legs nicely inked, you need to remove the masking paper and clean up any ink "glitches" with paper towel, baby wipes or Q-Tips. You can see me cleaning up the background of my octopus in the above photo, taken by my friend Bee Shay.

My last class was with Maria Arango Diener. Maria is a woodblock artist of great talent. I love her work and learned so much from her. Unlike all the fish printing I did earlier in the week, carving a relief printing block was something I had done before, so it was not a totally new art form for me. I really enjoyed the class, partly because I was back in my comfort zone, but mostly because it was so much fun and I got so much useful information from Maria.

I used a piece of wood that I found on the sidewalk one day on my way to lunch and a ginko leaf as my design elements and did a simplified sketch for my woodblock.

Each of the participants in the class was to pull 17 prints so we could exchange a print with each person in the group. We all came away with a little portfolio of prints. I was so impressed with the work done by the other artists and I was so happy to have a piece of their art to take away with me.


I was lucky enough to be in the same class with Bee, my buddy and roomie for this workshop. She did a wonderful print of seahorses that she took from a relief print of a seahorse she had in her portfolio.

One of the nicest things about my time in Fort Collins turned out to be Fort Collins. It's a lovely little city, home of Colorado State University (where we had our meeting and class rooms). We all found that there were shops there for every taste. I was especially thrilled to discover that Fort Collins had two bead shops! Two! And Jerry's Artarama, too. I mean, for what more can one ask? Oh, you want more? Well, there's Screen Door Studios, a wonderful place to buy art, beads, baskets, one-of-a-kind sweaters and all sorts of amazing jewelry and I found way too many things there that had came home with me. (Try packing three baskets from Ghana in your suitcase sometime!) Fort Collins is pretty, interesting, restaurant-filled, friendly and a great place to spend some time. I especially enjoyed Old Town and I was sorry to leave.

"Painting is just another way of keeping a diary." Pablo Picasso
2 comments:
o sure did have fun printing fish and shopping
Well you learn something NEW everyday! I have never even heard of fish printing before, much less considered how intricate the process might be. Amazing. Thank you so much for opening my eyes to this very cool art.
Post a Comment